To ensure that even beginners can proceed without getting lost, we will explain the process along with explorer settings and efficient development methods using VS Code.
1. Checking the Operating Environment (Confirming CPU Architecture)
First, check the type of CPU in your PC. This will determine which version of the software you need to install.
- Open Windows Settings > System > About.
- Check the item labeled “System type.”
- If it says “x64-based processor”: Most Windows PCs fall into this category. Choose software labeled “x86_64,” “x64,” or “AMD64.”
- If it says “ARM-based processor”: Select software for “ARM64” (common in recent Surface devices, etc.).
2. Installing Docker Desktop and Updating WSL
Install the foundational software required to run Docker.
- Download the installer that matches your CPU (confirmed in Step 1) from the official Docker website and run it.
- If the installation settings screen includes the option “Use WSL 2 instead of Hyper-V,” be sure to check it.
- After installation is complete, restart your PC and launch Docker Desktop (if the terms and conditions screen appears, click “Accept”).
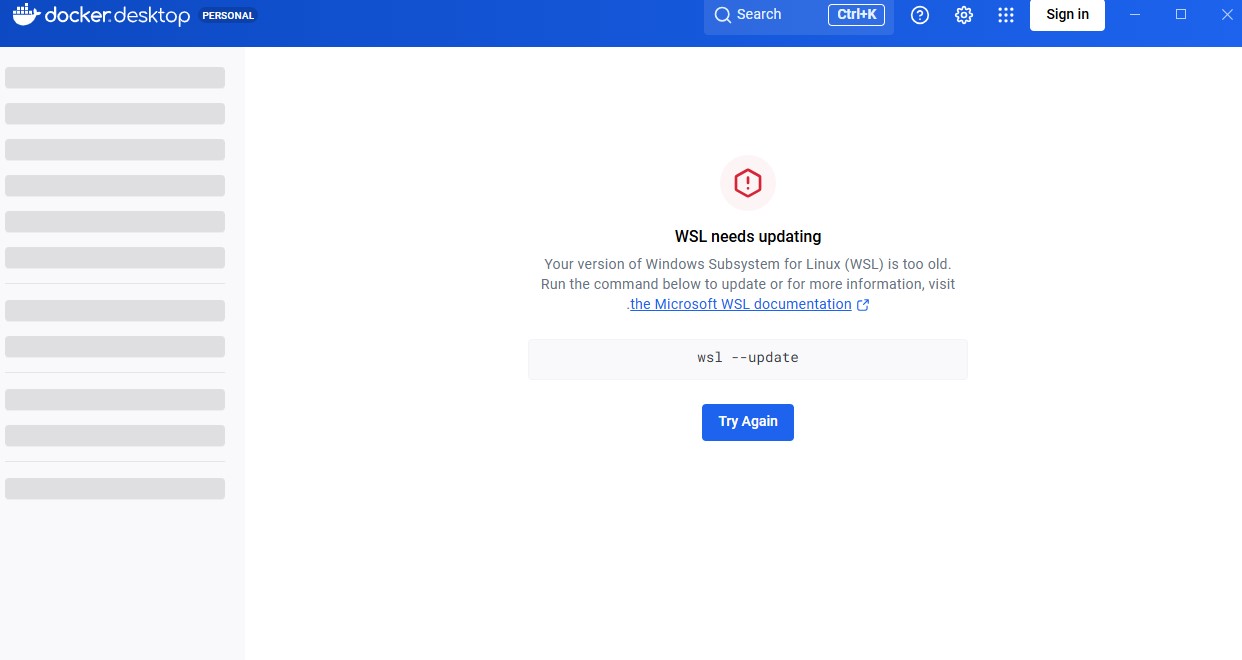
*If you encounter a “WSL needs updating” error upon startup, please update Windows WSL using the following steps.
- Search for “PowerShell” in the Start menu and click “Run as administrator.”
- Enter the following command and press Enter.
wsl --update - After the update is complete, click the “Restart” button on the Docker screen or restart your PC again.
3. Installing and Initially Configuring Ubuntu 22.04 LTS
Prepare the Linux (Ubuntu) environment that will run on WSL.
- Open the Microsoft Store, search for “Ubuntu 22.04 LTS,” and click “Get” (Install).
- After installation, click “Open” to launch a black terminal screen. *Note: You will need to wait a few minutes.
[Initial Setup (User Creation)] Follow the on-screen instructions for initial configuration.
Enter new UNIX username:Enter your desired name in lowercase alphanumeric characters and press Enter.New password:Enter your password and press Enter. (*For security reasons, nothing will be displayed on the screen when you type, but your input is being recorded.)Retype new password:Enter the same password again and press Enter. It is complete whenInstallation successful!is displayed.
[Docker Integration Settings]
- Click the gear icon (Settings) in the upper right corner of the Docker Desktop screen.
- From the left menu, open Resources > WSL Integration.
- Set the switch for “Ubuntu-22.04” to ON and click “Apply & Restart” in the bottom right. Now you can use Docker within Ubuntu.
4. Creating the Project Directory
To improve development efficiency, we recommend using VS Code (Visual Studio Code) for creating files.
[Preparing VS Code]
- Install VS Code and ensure the “WSL” extension (by Microsoft) is installed.
[Creating Folders]
- Open the Ubuntu terminal and enter the following commands in order to create a folder.
mkdir -p ~/docker-project/site1cd ~/docker-project/site1 - Next, enter the following command to launch VS Code in the current location.
code . - (First time only) If prompted with “Do you trust the authors of the files in this folder?”, click “Yes.”
5. Creating and Placing docker-compose.yml
Create a file that serves as the blueprint for your container.
- Right-click in the file list on the left side of VS Code and select “New File.” Name it
docker-compose.yml. - Copy and paste the following code as is and save it. *In YAML files, the leading spaces (indentation) are critical. Be careful not to include any full-width spaces.
services:
db:
image: mysql:8.0
container_name: site1-db
restart: always
environment:
MYSQL_ROOT_PASSWORD: password
MYSQL_DATABASE: wordpress
MYSQL_USER: wp_user
MYSQL_PASSWORD: wp_password
volumes:
- db_data:/var/lib/mysql

wordpress:
depends_on:
- db
image: wordpress:latest
container_name: site1-wp
restart: always
ports:
- "8080:80"
environment:
WORDPRESS_DB_HOST: db:3306
WORDPRESS_DB_USER: wp_user
WORDPRESS_DB_PASSWORD: wp_password
WORDPRESS_DB_NAME: wordpress
volumes:
- ./wp-content:/var/www/html/wp-content

volumes:
db_data:
6. Starting and Verifying the Container
Using the terminal within VS Code is convenient as it saves the effort of switching windows.
- Open the VS Code top menu “Terminal” > “New Terminal.”
- Enter the following command in the terminal at the bottom of the screen and press Enter. It may take some time during the first run as software needs to be downloaded.
docker compose up -d - Open your browser and access
http://localhost:8080. If the WordPress initial setup screen appears, you have succeeded!
A wp-content folder will be automatically generated inside the site1 folder. If you want to view it in Windows Explorer, you can access it by entering \\wsl.localhost\Ubuntu-22.04\home\(username)\docker-project\site1 in the address bar.
[When ending development] To reduce the load on your PC, please stop the processes with the following command after you are finished.
docker compose down