What is Scss (Sass)? Explaining the Differences and Benefits from CSS
Scss and Sass are extended languages (preprocessors) that allow CSS to be written more efficiently, like programming. CSS is indispensable for styling websites, but as projects grow larger, the code becomes long and difficult to manage. Sass/SCSS was born to solve this problem. Since it is an extension of CSS, files written in Sass or SCSS cannot be loaded directly by the browser. They are ultimately converted (compiled) into a standard CSS file by a dedicated tool (compiler) before use.
Scss and Sass: The Two Syntaxes and the Mainstream One
Sass has two types of syntax: “Sass syntax” and “SCSS syntax,” and both are sometimes collectively referred to as “Sass.” Sass Syntax (.sass): A syntax that represents structure using indentation, without using curly braces ({}) or semicolons (;). SCSS Syntax (.scss): A syntax closer to standard CSS, using curly braces ({}) and semicolons (;). Currently, the SCSS syntax (with the .scss extension), which has high compatibility with standard CSS and is easier to learn, has become the mainstream. In this article, we will also explain based on the SCSS syntax.
Key Differences and Benefits of CSS and SCSS
The biggest advantage of using SCSS is the ability to use features like “variables” and “nesting” that are not available in standard CSS, which reduces the amount of code and improves maintainability (ease of maintenance).
| Feature | CSS | SCSS | Benefit |
|---|---|---|---|
| Variables | (Limited) | Available | Values like colors and font sizes can be managed and changed collectively. |
| Nesting | Not possible | Available | The relationship between parent and child elements can be clearly described, and the code is shortened. |
| Reusability | Not possible | Mixin is possible | Allows you to define a set of frequently used styles and call them where needed. |
By using the nesting feature, you can write CSS in a nested manner to match the HTML structure, as shown below.
SCSS Code Example
/* SCSS (style.scss) Example */
.header-nav {
  // Parent element style
  width: 100%;
  padding: 10px 0;
  // Child element style written with nesting
  ul {
    list-style: none;
    padding: 0;
    margin: 0;

    // Further child element style
    li {
      display: inline-block;
      a {
        color: #333;
        text-decoration: none;

        // Pseudo-elements (like :hover) can also be nested
        &:hover {
          color: #007bff;
        }
      }
    }
  }
}
Compiled CSS
/* Result of conversion to CSS (style.css) */
.header-nav {
  width: 100%;
  padding: 10px 0;
}
.header-nav ul {
  list-style: none;
  padding: 0;
  margin: 0;
}
.header-nav ul li {
  display: inline-block;
}
.header-nav ul li a {
  color: #333;
  text-decoration: none;
}
.header-nav ul li a:hover {
  color: #007bff;
}
By using SCSS, the code becomes shorter and easier to read, making the structure easier to grasp, especially for beginners in website production.
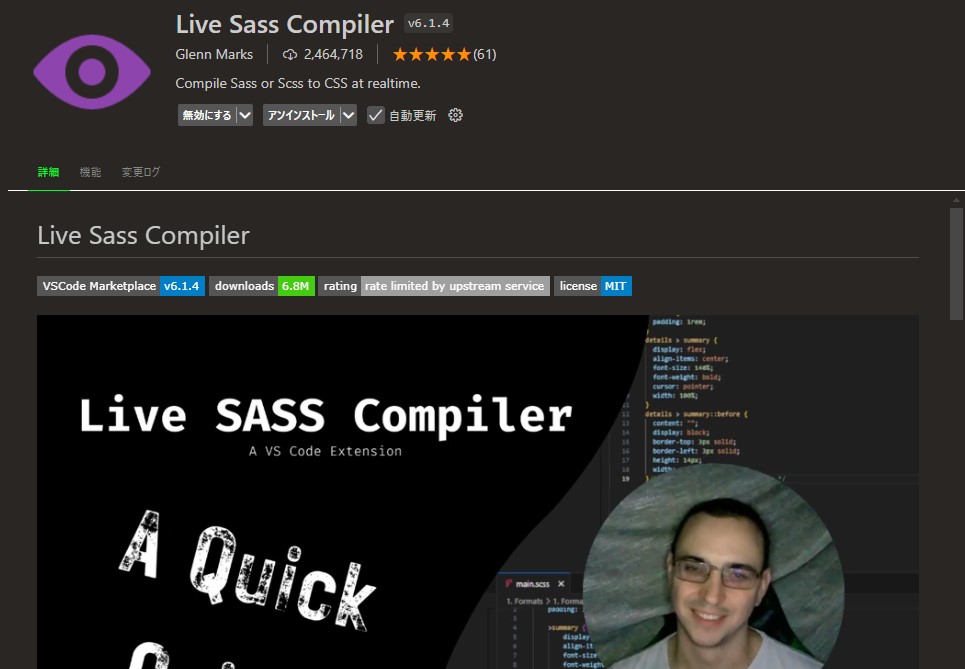
What is “Live Sass Compiler”? Benefits of Use and Main Features
Live Sass Compiler is an extension (plugin) for one of the most commonly used editors in web development, “Visual Studio Code (VS Code)” or “Cursor.” By using this extension, SCSS files are automatically converted (compiled) into CSS files every time they are saved, without the need to manually execute commands.
Benefits of using Live Sass Compiler
For web development beginners, the complexity of environment setup can often be a major hurdle, but the biggest advantage of using “Live Sass Compiler” is that you can immediately benefit from SCSS without complicated configuration.
- Improved Development Efficiency through Automatic Compilation: Since CSS is automatically generated every time an SCSS file is saved, there is no need for manual compilation. You can write code and check the results immediately.
- Simplified Environment Setup: While using Sass originally might require installing Ruby, this extension only requires installation in VS Code, significantly reducing the effort of environment setup.
- Real-time Error Detection: If there is an SCSS syntax error, an error message is displayed during compilation, allowing you to immediately notice and fix the mistake.
Main Features of Live Sass Compiler
- Automatic Monitoring of SCSS Files: Clicking the button at the bottom of the VS Code screen starts constantly monitoring SCSS files in the project.
- Conversion to CSS Files: When an SCSS file is saved during monitoring, a .css file is automatically generated based on the settings.
- Selection of Output Format: You can choose the format of the generated CSS file in the settings (e.g., expanded format for readable code, compressed format to reduce file size).
- Source Map Generation: A source map (.map file) that indicates which line of SCSS corresponds to which line of CSS can also be generated simultaneously. This makes it easier to locate the corresponding part within the original SCSS file when debugging CSS using the browser’s inspection tool (finding and fixing issues).

Installation is only 3 steps! How to Install Live Sass Compiler
If you are using Visual Studio Code (VS Code), installing “Live Sass Compiler” is very easy. It can be completed in the following 3 steps.
Step 1: Open the VS Code Extensions Tab
First, launch VS Code. From the menu on the left side of the screen, click the square icon (Extensions management).
Step 2: Search for Live Sass Compiler
Enter “Live Sass Compiler” in the extensions search box. From the search results, look for the “Live Sass Compiler” created by Glenn Marks (which often has a lightning bolt icon).
Step 3: Click the Install Button
Once you find the desired extension, click on it and then click the “Install” button on the displayed details screen. When the installation is complete, the “Install” button will change to a gear icon labeled “Manage.” Installation is now complete. It’s very easy!
[Super Easy] Basic Usage and Configuration of Live Sass Compiler
Once the installation is complete, let’s start coding an SCSS file.
Usage 1: Create an SCSS File
Create a file with the .scss extension (e.g., style.scss) in the project folder, write the SCSS code, and save it.
SCSS Code Example
/* style.scss */
$main-color: #007bff; // Define variable
body {
  font-family: Arial, sans-serif;
}
.button {
  background-color: $main-color;
  color: white;
  padding: 10px 20px;
  &:hover { // Nesting and parent selector reference (&)
    opacity: 0.8;
  }
}
Usage 2: Start Compilation with “Watch Sass”
With the SCSS file written, click the “Watch Sass” button in the status bar at the bottom right of the VS Code window. When the button changes to “Watching…”, the automatic compilation monitoring has started.
Usage 3: Check that the CSS File is Automatically Generated
Once monitoring starts, the following two files are automatically generated in the same folder as the SCSS file: style.css: This is the standard CSS file converted from SCSS. style.css.map: This is the source map file.
Now, every time you edit and save the SCSS file, style.css will be automatically updated.
How to Change Basic Settings (Changing the Output Location)
By default, the CSS file is output to the same location as the SCSS file, but it is often desirable to manage SCSS files in a sass/ folder and CSS files in a css/ folder.
This setting can be easily changed by editing the VS Code settings file (settings.json). Open the VS Code settings screen and type “Live Sass Compile” in the search box. Click “Edit in settings.json” under the item “Live Sass Compile: Settings: Formats.”
Add (or edit) the following settings within the settings.json file.
"liveSassCompile.settings.formats": [
{
  "format": "expanded", // Output format: Expanded (readable format)
  "extensionName": ".css", // Output file extension
  "savePath": "~/../css/" // Relative path to the output destination. Go up one level from the SCSS folder (../) and output to the css folder
}
],
The example above is a setting to output to css/style.css when the SCSS file is located at sass/style.scss. By setting savePath to ~/../css/, you specify that the CSS file should be output inside the css folder by going up one level from the location of the SCSS file (../).
If you save the settings (Ctrl+S or Cmd+S), the CSS will be output to the specified location from the next compilation onwards.
Common Pitfalls! Troubleshooting When Errors Occur
We will explain common troubleshooting steps for when Live Sass Compiler fails to generate CSS automatically or displays errors.
1. Syntax Error (Incorrect Sass/SCSS Writing)
[Cause] This occurs when there is a missing semicolon (;), forgotten closing curly brace ({}), or incorrect variable name in the SCSS code. [Solution] Detailed error messages are displayed in the VS Code “Output” panel (bottom of the screen) or “Problems” tab. Check the file name and line number written in the error message and correct the corresponding part. Pay particular attention to checking for forgotten closing braces in places where nesting or Mixins (discussed later) are used.
2. Monitoring is Stopped
[Cause] You may have inadvertently clicked the “Watching…” button again, which releases the monitoring state (reverts to “Watch Sass”). [Solution] Check the bottom right status bar of VS Code. If it says “Watch Sass,” click it again to return to the “Watching…” state.
3. File Name and Extension Issues
[Cause] The file will not be compiled if its extension is not .scss but simply .css or .txt. Please ensure the file name is XX.scss. Also, it is common practice to prepend an underscore (_) to the file name of SCSS files intended only for import (e.g., files for variable definitions only) (e.g., _variables.scss). Files with an underscore are often set not to compile individually, so care is needed.
4. Output Folder Issues (Permissions or Configuration Errors)
[Cause] The path set for savePath (output destination) may be incorrect, or you may not have permission to write to that folder due to PC’s OS settings.
[Solution] Reconfirm that the “savePath” description in settings.json is correct as a relative path. Temporarily delete the setting and revert to the state where the CSS is output to the same directory as the default SCSS file to see if compilation succeeds. If it succeeds, the path setting is likely the cause.
[Advanced] Customizing Settings for Even More Convenient Use
Live Sass Compiler is sufficiently useful even with its initial settings, but you can move closer to a more professional development environment by customizing a few settings.
1. Change the CSS Output Format
By using different formats for the generated CSS files during development and production, you can achieve both efficiency and performance. expanded: This is the default format. The CSS code is line-broken and indented, making it very easy to read, and is suitable for development and debugging. compressed: All line breaks and whitespace are removed, minimizing the file size. Compiling in this format for production contributes to faster page load speeds.
Change the value of “format” in the settings file (settings.json) as follows.
// Example of changing to compressed format
"liveSassCompile.settings.formats": [
{
  "format": "compressed", // Change here
  "extensionName": ".min.css", // It is also common to add .min to the file name for clarity
  "savePath": "~/../css/"
}
],
2. Exclude specific files from compilation targets
In SCSS, files whose sole purpose is to be @imported (loaded) by other SCSS files (e.g., variable or Mixin definitions) are often created. Since these files themselves do not need to be converted to CSS, it is useful to set them to be excluded (ignored) from compilation. Exclusion can be achieved by prepending an underscore (_) to the file name, but you can also explicitly add specific files or folders to an exclusion list.
// Example of excluding specific folders from compilation targets
"liveSassCompile.settings.excludeList": [
  "/node_modules/", // Folders not generally used
  "/vendor/",
  "/assets/scss/utility/" // Exclude specific utility folder
],
3. Automatically Add Vendor Prefixes
Some CSS properties (especially newer ones) must be written with special prefixes (vendor prefixes, e.g., -webkit-, -moz-, etc.) depending on the type of browser (vendor). Although it is not a Live Sass Compiler feature, by using other extensions or tools such as Autoprefixer, you can automatically add these prefixes to the CSS file after SCSS compilation. This further improves development efficiency as developers can write code without worrying about prefixes.
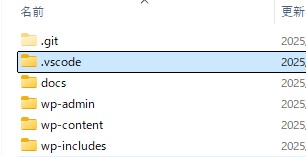
4. Separating Settings Per Project (Utilizing .vscode/settings.json)
Live Sass Compiler settings are applied globally across VS Code (User Settings), but different compilation settings may be required for each project. For example, Project A might need output to a CSS folder, while Project B needs output to a dist folder.
In such cases, you can specify settings that apply only to that project by creating a “.vscode” folder in the project’s root directory and creating a “settings.json” file inside it.
The content of settings.json is the same as the global settings file. Settings written here take precedence over the global VS Code settings.
{
  "liveSassCompile.settings.generateMap": true,// true if you want Sass to be displayed as CSS in developer tools
  "liveSassCompile.settings.formats": [
  {
    "format": "compressed", // Format of the output CSS. "expanded" is the usual readable format. "compressed" is the compressed format.
    "extensionName": ".css", // Extension of the output file. Usually .css. .min.css for compressed
    "savePath": "/wp-content/themes/new-t/css" // Specify the relative output folder from the .scss file. null means the same level, '/' means the root directory.
  },
  ],
}